Monday, 7 May 2018

Sigma 105mm f2.8 EX DG OS HSM Macro Lens

Originally I had the Canon 100mm F2.8 mk2 and whilst it is a cracking lens I didn't use it that often, and as my photography had taken a turn towards wildlife I decided to sell the Canon 100mm lens and put it towards a Canon 500mm f4 L IS (which has now also been sold as Canon decided it had come to the end of its life).
So when I read a review in Photoplus of a bunch of macro lenses  the Sigma 105mm f2.8 EX DG OS HSM Macro Lens came out as best value for money winner, at £360 whats not to like, its half the price of the Canon equivalent and almost matches the Canon on the image quality stakes.

After hunting around on the good old WWW and doing the necessary research I took the plunge, found one on sale at Mathers of Lancashire for £339 including delivery.

I ordered on the Thursday not expecting to see it until the following week, but i was wrong there, phone call from Mathers asking if i needed a filter for the front and informed me it would be on its way the same day for delivery on the Friday before 1pm !
True to their word it rocked up about 10.30am, fantastic service from Mathers!!

So far all I have done is MA'd it too my 5dmk4 using Reikan Focal, it needed a setting of  +2 to get the focal point on the money.
Other than that it looks like a good bit of kit for the money.

I will update this post when I get it out in the field.

Wasn't entirely happy with the MA results from Reikan Focal so I decided to do it old school on my home made ma test scale.
Aperture set to f2.8 iso 200 manually defocusing to both sides of the focal point  this is what I found.

 The above is the result using Reikan focal a setting of +2 on the MA scale, looking at this picture to me there is a slight back focus on this setting.

The above I have set MA to +20 which gives a big front focus.

On this one I have set MA to -20 which gives a big rear focus

Finally I have set MA to 0 and looking at this result I am happy that this is where it should be set.

All of these results are after multiple shots defocusing between each shot manually to ensure a consistent result.

A quick whizz into the green house for a tester shot.
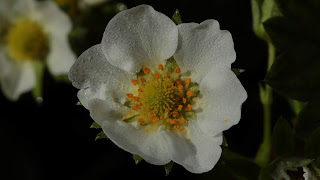
Shot using a tripod f14 iso200 1/320th 105mm
So far pleased with this lens !


Gimbal Head Update

OK so I bought one of these NEST   NT-530H Mk2 some time ago,
Nest NT-530H MKII Carbon Fibre Gimbal Head
 Got it from these guys UK Digital


and I do love it, don't get me wrong, there is  no slop in the bearings etc good solid construction, great features:

  • - 10 layer Carbon Fibre
  • - Precision bearings
  • - Arca-Swiss compatible
  • - 360 degree pan
  • - Load capacity of 25kg

My one gripe with it is that it is far from free moving.

After putting up with it since I have had it hoping it may free off with use I decided to strip it down and have a look at what makes it tick!

3 Alan bolts on the top removed the carbon fibre head leaving the horizontal rotating bit behind this is held in place with another larger Alan bolt which in turn has a plastic washer and a bearing race, once that is off  there is a black outer casing followed by the inner workings.
I have never in all my days come across anything so sticky as what was on the main bearing, whilst it might do a good job of lubricating the bearing it is this goo that gives you the damping effect and makes the head somewhat hard to rotate, and for BIF shots etc it makes life easy if the gimbal head moves freely.
I was impressed with the construction, precision and quality of the bearings is very good it is just the goo that spoils it for me.

So I dunked it all in some white spirits to remove the sticky goo and repacked it with High Melting Point Lithium Grease, whacked it all back together and hey presto beautiful smooth rotational movement, just what the doctor ordered

As for the up / down axis I have left that with the sticky goo as that stops your lens / camera setup doing a rapid nose dive if you haven't got it balanced correctly.

A quality bit of kit at a reasonable price only spoilt by the goo they put it together with.

Tuesday, 24 April 2018

Restharrow Scrape 20.4.18

A cracking morning light winds, bright sunshine great conditions, arrived about 0800 for today's outing I am using Canon 5dmk4 and Sigma 150-600 Sport.

Surprisingly I was all alone in the hide this morning, not a great lover of Greylag Geese but I did feel a bit sorry for this one individual, there is a pair of Swans nesting over the far side of the scrape and Mr Swan, here just flexing his muscle,

1/1250th @f9 iso400 600mm

was being very territorial, he would not leave this particular Graylag alone.

1/1250th @f8 iso400 600mm

Then a pair of Canada Geese dropped in and one of them decided that (I assume it was the he) he was going to get the same Graylag and continued to chase it for some time,

 1/1000th @f11 iso1000 600mm

 1/1250th @f11 iso1000 600mm

which gave Mr Swan a breather.

Next up Mr Swan decided he had had enough of this shenanigans and set about the Canada Goose, it really was quite entertaining !

 1/1000th @f8 iso400 600mm

1/1250th @f8 iso320 600mm 

Eventually they all calmed down and started to go about there own business !

There was also Northern Shoveller, Gadwall, Shell duck, Little Grebe, Coot, Mallard, Lapwing and Tufted duck on the scrape.

Saturday, 21 April 2018

Oare Marshes 16.4.18

First day out for ages, beautiful sunny morning arrived at Oare  about 0700 bit late really but hey ho.

Overall pretty quiet walked along the sea wall and up the estuary, first decent spot was a Peacock Butterfly on Hawthorn blossom, kit for today is the Canon 7dmk2 with my Sigma 150-600 Sport.

1/500th @ f8 iso200 600mm
It just sat there displaying those big scary eyes, I couldn't resist a shot of it.

Shortly after that a few bearded Tits put in an appearance but they just wouldn't sit nicely, just couldn't get a good clean shot, the best I could do was this one.

1/400th @f8 iso200 600mm

Plenty of Sedge Warbler activity again getting a clean shot was the issue, it was just one of those days where the birds just didn't quite perch in the right spot, this Sedge Warbler I watched for 20 minutes it was displaying and singing using the same bush, it would fly up into the air hover and dive down into the base of the bush, then work its way back towards the top.

1/400th @f8 iso200 600mm

Again it never sat in the right spot clear of twigs and shadows !

1/250th @f8 iso200 600mm

None the less an enjoyable walk round Oare.

Thursday, 1 March 2018

Data Recovery

Ever had that sinking feeling when you get home from a good shoot and you go to transfer your shots from your memory card to your PC etc and find that there are no pictures to transfer AGGHHHH !!!
Touch wood this has not happened to me, but my friend Dave had just been on a once in a lifetime Safari only to discover that the memory card that had most of his shots on had some how been corrupted !!
So what do you do in a case like this ?
First thing is don't panic there is normally a way to recover your lost treasures.
Ideally if you are on the ball with PC's create an image of the card before you do anything else, that way you always have a safety net, mount the image you have just made and do all your data recovery attempts from the image, this way you don't touch the original card.
OK next stop is the card makers website and look for support, most of the manufacturers have free recovery software available that will (unless the card is totally fried) recover your files.

So you download and install the software point it at the image, failing that use the card, the software will then ask you to select a few bits and bobs and then run a scan of the image / card, if you have set your PC/ Laptop to sleep after xx minutes disable it, you do not want to interrupt this scan !! even if it looks like the scan has stopped let it run to the end, if it crashes try again.
Once the scan has completed it should list all the files available for recovery select them and a destination and away you go.

Preferably before you tackle the dodgy card format one of your other memory cards and do a dry run to see what you can recover form a good card, just so you don't make a costly mistake with the dodgy card and lose your data completely, that's why working from an image is safest.

It is surprisingly difficult to lose data, even if you format a card all the images will still be there, when you format a card all you do is remove all the flags and pointers that tell the controller what areas of the memory contain data.

What do you do once you have recovered your precious pictures from your card ?
Well obviously you will lose confidence in the cards ability to record data accurately, I mean you wouldn't want to go on another important shoot and use that card right ?
Before you bin it format it in the normal way and then fill the card up with data if it is 32Gb write 32Gb worth of files to the card and then try to read them back to your PC, do this several times to test the cards integrity.

Its then up to you what you do with the card based on the results of the test, personally if it performed the test flawlessly a number of times, I would use it again but not on anything crucial to start with.

Finally if the above recovery procedure doesn't recover your files most manufacturers provide data recovery services for their cards, some charge some don't depends on the card type age etc but its a good last resort.
Even if the card is totally unreadable by the likes of you and me, they can pop a card open and bypass the memory controller and read the memory direct.

Fingers crossed it will never happen to you but if it does I hope the above may help you to recover your files.

The Beast From The East

Well its too bloody (windchill -7) cold for me too go out birding, so I just kept an eye on the back garden and there has been lots of activity, plenty of Blackbirds, Blue Tits, Sparrows, Starlings, Dunnock, Wren, Robins, Magpies and a solitary FieldFare which has been in the garden for the last two days now.


 Shot through the double glazing so quality is not as it should be.
Far from being a social bird this FieldFare has been guarding the bits of apple that I put out as if its life depended on it (and well it may), as soon as a Blackbird or Starling went anywhere near the apple he was on it fighting off all intruders, the only company he would tolerate was the Sparrows as I assume he knew they were not competing for the same food.
The only time it took flight was if I stepped outside to top up the feeders or if the Magpies dropped in.
The Wren was busy looking under the coping stones on my Barbi wall and frequently found a juicy morsel.
Blue Tits checking out the bird box and feeding on the sunflower hearts.
Starlings were giving the fat balls some welly, Blackbirds were attempting to pick up the bits from the fat balls that the Starlings were dropping but the FieldFare was relentless in scaring them off !

Wednesday, 14 February 2018

Sigma 150-600 Sport Auto Focus Fine Tuning Update


Well after hours of searching I haven't been able to find any Canon shooters that have worked out the ratio (if there is one) between Sigma and Canon AF adjustment scales.

I spoke to Sigma support nice chap by the name of Daniel he explained the following with regard to the AF fine tuning with regard to the above set of figures I found, the x20, x40 x60 x80 etc figures are used by Sigma for testing and setup, however he explained that the distances used via the usb dock are indeed the ones to use for fine tuning the AF system.
Using the distances in the software will give a better AF performance across the entire focal range than using the x20, x40 method.
He also said to start at the 2.6m end of the scale and work up toward infinity at the various focal lengths, again stating that this will give a better result across the entire focal range.

So that is good enough for me straight from the horses mouth so to speak, that is what I will endeavour to do !!