Wednesday, 30 August 2017

Bird Photography Depth Of Field Test

This is an addition to my earlier post regarding Depth Of Field (DOF), this one is specifically targeted at how to best use your available DOF when photographing static birds.
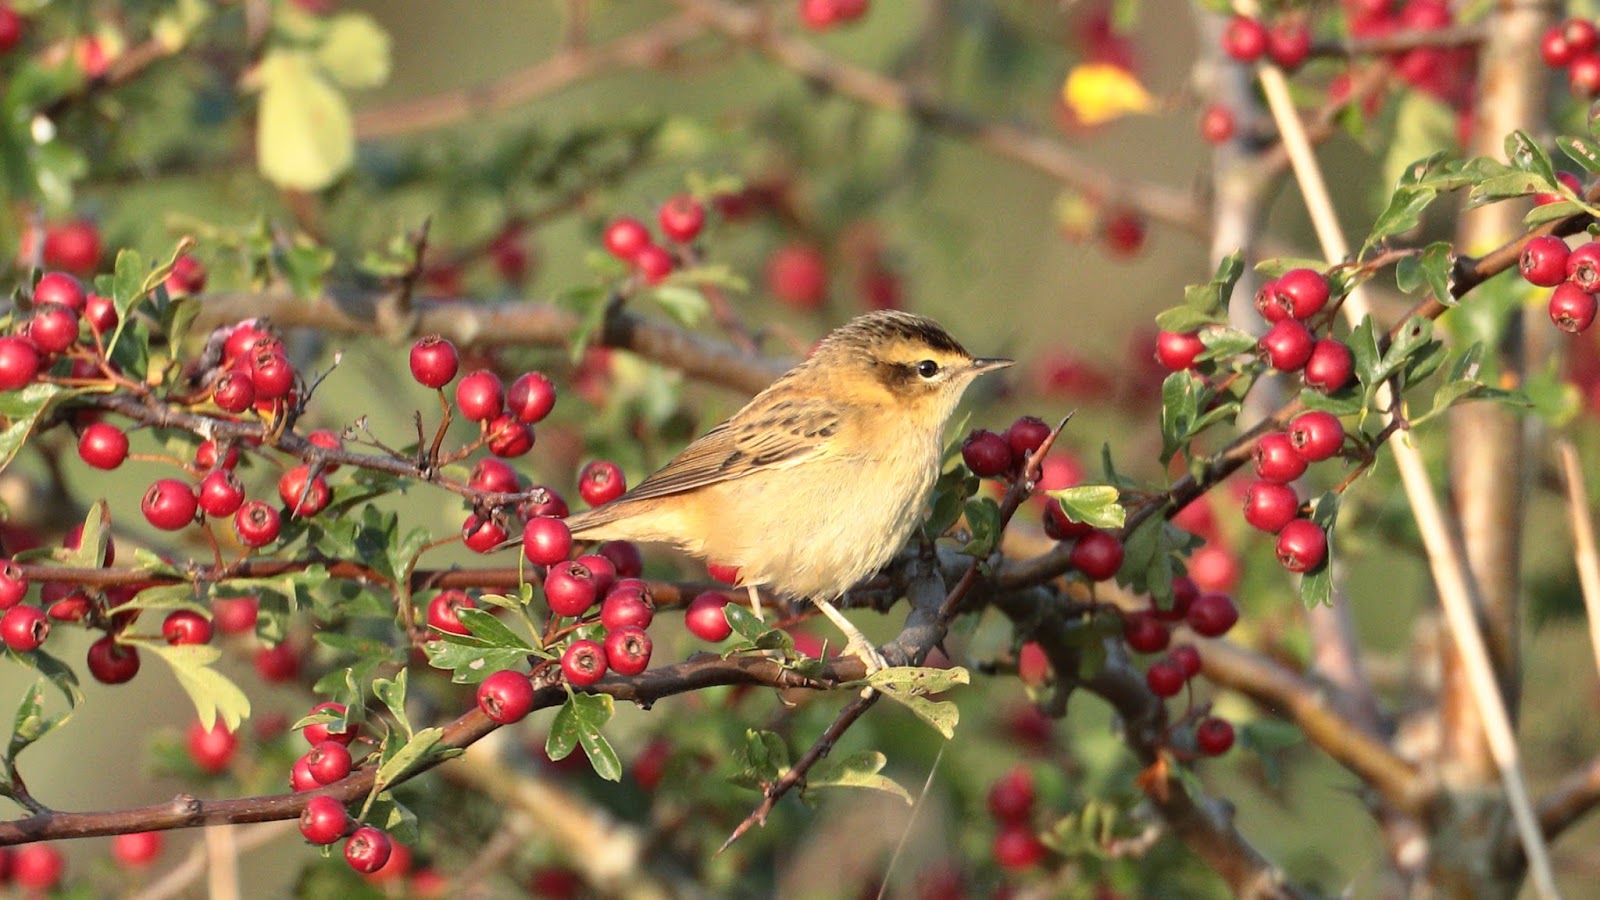
The aim of bird photography in my opinion is to get a sharp detailed shot of the entire bird, this means in an ideal world having the light behind you, the bird to be perched, nicely posed with an un cluttered foreground and a lovely bokeh in the background, as in the Stonechat picture below, its a lot to ask but it does happen and when it does and you nail the shot, well it doesn't get much better than that.
 
Canon 5dmk3 700mm 1\640th f9 iso320
Taken at Pegwell Bay Country Park 2016

A few words about my model, I have used my friendly garden kingfisher I have named Alice, I'm not sure who the artist is but they need to go back and study their subject in a bit more detail as Alice has an orange tip to her beak, which is a first for me, I am assuming the artist intended Alice to be a female but put the orange in the wrong place, that aside Alice is 150mm tall and 125mm from the tip of her beak to the end of her wing which I think is pretty much around the size of a real Kingfisher.
There is a small white dot on her eye from the tip of her beak to this dot is 51mm.


Some photographers say focus on the eye, get the eye sharp and the rest will be fine, others say focus down the body, well lets put the theory to the test, the testing below will hopefully prove where the best point of focus is to achieve tac sharp results.

One of the Layzee golden rules is always check your settings, nothing worse than having a once in a lifetime shot spoilt because you forgot to put your settings back to normal, check them often ! I say this through experience !! 

OK so the setup is as follows, Alice is sitting approx 6m from the camera and approx 45 degree angle across the field of view with the tip of her beak closest to the camera, we have a lovely sunny day, I am using my Canon EF 500mm f4 L IS on my 5dmk4, tripod with gimbal head.
The only setting I am changing is going to be the f stop, I am using AV mode which means the shutter speed will change according to the light conditions as each shot is taken, iso100 is set for the duration.
I have also adjusted the exposure to compensate for the white background +1ev for all the shots.
I have taken shots at f4, f7.1, f14, f18.
I have taken 2 shots at each aperture setting one with the focal point on the eye the other with the focal point on her left leg underneath the body (as you look at her).
Baring in mind that our DOF will be approx 50% in front and 50% behind the actual focal point (unless you have dialled in some front or back bias) and knowing that from the centre of the eye to the tip of the beak is nearly 51mm to ensure we have the tip of the beak in sharp focus we need a total DOF of 110mm, we also know it is about 6m from the camera to Alice.
Using the above with a DOF calculator the ideal f stop focusing on the eye would be f14.

OK so first up is f4 focusing on the eye a lot of photographers shoot wide open for the fastest shutter speed in this case f4.
f4 eye
f4eye_cr.jpg
The above link will display the full size image in a new window so that the detail can be seen, I have added links below all the images as views on the blog are restricitve.

Tac sharp on the eye but we can clearly see that the DOF is so shallow (3.17cm) that only a very thin slice of Alice is sharp, the rest is in my opinion unacceptably soft. 
As the DOF is so shallow it doesn't matter where you focus you are not going to get all of Alice sharp.

Next up is f7.1 again focal point is the eye, total DOF of 5.65cm.

Still we see at f7.1 that the tip of the beak is not sharp, also the tips of the wing and tail are also still out of focus, using the top of the leg for the focal point makes little difference the tail is nice and sharp but the beak is not.
OK now lets jump to f14 again the focal point is the eye, which according to our DOF calculator gives us a total DOF of 11.29cm, this should be the sweet spot for Alice to be caught in all her glory.

The tip of the beak is tac sharp as is the majority of Alice, looking at the tail however it still looks a little soft.
Next up is f14 focal point is the leg, this is to me is acceptible, the tip of the beak is a little soft if I am picky about it and the tail feathers are still a little soft, but overall Id choose this over the shot above
f18 looks like the best  fit to me total DOF of 14.23cm again focal point of the eye, this looks to be sharp front to back which is what we are trying to achieve
f18 with focal point of the leg doesnt look quite as crisp and sharp as the shot taken using the eye as the focal point.
In summary it would appear that for Alice the best focal point is indeed the eye that said however if you were to apply the same principal to a Long Tailed Tit you would never get the tail sharp due to the distance from the centre of the eye to the end of the beak on a LTT being 15mm at a guess.
It would seem to me like there is no difinitive correct way, its all a matter of experience, the orientation of the bird, its size etc and above all what works for you, you need to assess each shot on a shot by shot basis and apply what you have learnt via experience out in the field, after all that is the best classroom.
Sometimes our results are disappointing but that is how we learn, another Layzee golden rule dont be afraid to ask, for those that dont ask dont get !


Tuesday, 29 August 2017

Stodmarsh 27.8.17

What a great morning no wind plenty of sun and mist !
Cobwebs full of drops of moisture always look good reminds me when I collected them with a twig bent round like a bat when I was a kid.

One thing about hot days is heat haze the further you are away from your subject the worse it gets, so trying to get tac sharp shots on hot days is a no no, cold winter days are way better for image sharpness.

I decided to walk through from the Grove end to the Marsh hide as I don't tend to visit that hide very often, very little bird activity on the way through but I did get these nice early shots.

 Canon 5dmk4 500mm 1\160th f10 iso800


 Canon 5dmk4 500mm 1\800th f11 iso250


 Canon 5dmk4 500mm 1\500th f11 iso800


Finally arrived at the hide, there was a Blue Tit in the bushes outside the hide.

  Canon 5dmk4 500mm 1\800th f7 iso500

Quite a lot of activity, waders galore Green shank, Snipe, Ruff, Common, Green and a Wood Sandpiper, had a visit from a female Kingfisher, she perched and then went on a hovering spree finally diving but coming back to the perch with nothing for her efforts, unfortunately she was just too far away for any good shots.

 Canon 5dmk4 500mm 1\1250th f7 iso500 


A bunch of Greylag Geese dropped in, bang goes peace and quiet ! then a Marsh Harrier decided to land and have a drink which put the fear of Christ up the waders who scattered to all points of the compass !

  Canon 5dmk4 500mm 1\2000th f6.3 iso1600 +1ev


  Canon 5dmk4 500mm 1\160th f11 iso200

Canon 5dmk4 500mm 1\160th f11 iso200

The Koniks are still there doing a grand job of keeping the vegetation down, got to love these ponies hard as nails !
 Canon 5dmk4 500mm 1\500th f11 iso800

There was also a lot of these guys whizzing about too I think and correct me if I am wrong it is an Emperor Dragonfly

Canon 5dmk4 500mm 1\2000th f5.6 iso1600

The walk back towards  Grove Ferry was largely uneventful I did hear an see some Bearded Tits but was not able to get any pictures as they were to low down in the reeds.

Friday, 25 August 2017

Oare Marshes 24.8.17

Another great start to the day, no wind plenty of sun great conditions, set off along the sea wall pretty quiet apart from the flocks of Godwits flying off out over the estuary.
I could see plenty of warblers flitting about but to far away for pictures.
I rounded the corner by the hide and started up the creek side several flocks of juvenile Goldfinches were in the bushes and flitting about from bush to bush.
 Juvenile Goldfinch
Canon 5dmk4 700mm 1\500th f7.1 iso800 

I moved up toward them slowly and let them settle before moving a little closer.

   Juvenile Goldfinch
Canon 5dmk4 700mm 1\500th f7.1 iso800
 
These were some of the shots I was rewarded with, fortunately no dog walkers or joggers were about to scare them off.

  Juvenile Goldfinch
Canon 5dmk4 700mm 1\500th f7.1 iso800

Juvenile Goldfinch
Canon 5dmk4 700mm 1\400th f7.1 iso800
 
However that was not to last the dreaded dog walkers began to appear at about 7am followed by the joggers.
Plenty of  Sedge Warblers about in and around the bushes and reeds some where happy to pose for a few shots
Sedge Warbler
Canon 5dmk4 700mm 1\800th f7.1 iso800
 
Sedge Warbler
Canon 5dmk4 700mm 1\1250th f7.1 iso800
 
 Sedge Warbler
Canon 5dmk4 700mm 1\800th f7.1 iso800
 
Sedge Warbler
Canon 5dmk4 700mm 1\1250th f7.1 iso800
 
As the dog walking and jogging hoards had arrived I decided to head back to the car park walking along the sea wall I first heard a Bittern followed by the ping of a Bearded Tit, I planted my tripod and waited, finally I saw a little movement out the corner of my eye and sure enough  there they were a couple of juvenile Beardies a little to far away for good shots but a couple are acceptable.
 
 Bearded Tit
Canon 5dmk4 700mm 1\800th f7.1 iso800
 
Bearded Tit
Canon 5dmk4 700mm 1\1000th f7.1 iso800
 
I hung about to see if they would come any closer but it wasn't to be, so I headed off to the car park and home for a cuppa and some breccy.
 

Sunday, 20 August 2017

Stodmarsh and Pegwell Bay visit 19/8/2017

Lovely sunny morning arrived at Stodmarsh NNR at 6am and proceeded to the reed bed hide, it was very quite just a few ducks and geese about, a Grey Heron in the distance was soon off on the wing when a large group of Grey Lags noisily arrived.
I set about testing with my 25mm extension tube (see post: Experimenting with 25mm Extension Tube On Canon EF 500mm f4 L IS.
A few fly pasts from a Marsh Harrier but nothing worth pressing the button for, it was that quiet I took a picture of a Wood Pigeon that dropped in for a drink.

Canon 5dmk4 700mm 1/800th f9 iso800

After a lot of nothing going on a Juvenile Female Kingfisher came in and as usual landed on the wrong perch sat there for 20 seconds before flying of over the reeds to look for some better hunting grounds.
Canon 5dmk4 700mm 1/640th f9 iso800


Its typical two perches to choose from one which is in the centre of the hides view is in full sun light, the other which is way off to the right hand side of the hide is in partial sunlight at that time of the morning and is really of no use to man or beast.

Canon 5dmk4 700mm 1/640th f9 iso800

I left Stodmarsh and headed off to Pegwell Bay, there have been reports of a Stone Curlew sighting so I thought I would go along and see what I could see, however knowing the terrain there it was doubtful if there would be an opportunity for a quality shot of it.
On arrival there was lots of activity both from cable laying works and the preparation for some fun run or something, I spotted this Female House Sparrow enjoying a breakfast of blackberries.

 Canon 5dmk4 700mm 1/1000th f9 iso800

I have never seen so much fruit on the trees and brambles, Apples, Pears in abundance, I was surrounded by the aroma of fruit smelled almost like a brewery ! this juvenile Goldfinch will no doubt be taking advantage of this bountiful harvest as autumn approaches.

 Canon 5dmk4 700mm 1/1250th f7iso200
I proceeded to walk up the coastal path, the tide was on the way in which tends to push the birds on to the shoreline, then the runners started, lots of them, to me that was a signal to go home for breakfast.
All in all quite a disappointing morning, but hey ho its always nice to get out in the fresh air.


Saturday, 19 August 2017

Experimenting with 25mm Extension Tube On Canon EF 500mm f4 L IS

I was at Stodmarsh NNR very little going on so I decided to use the time and see just what effect putting a 25mm extension tube had on my 500.
I used a Kingfisher perch as the target I focused on a little red bug right at the tip of the perch, here is shot 1 this is my 500 + a 25mm Extension Tube

Canon5dmk4 500mm 1\332 f9 iso800

So the first thing you notice when using an extension tube is you can no longer focus to infinity, you do gain the ability to focus a bit closer than the Minimum Focal Distance (MFD) of your lens, I would estimate that instead of the MFD of 14.6ft with the tube it was more like 10ft so quite a difference and no real loss of quality either, on the downside the focal range is severely curtailed, I would guess that the maximum I could focus out too was around 13m.

Ok next up is no extension tube but adding a 1.4 x extender instead.

Canon5dmk4 700mm 1\512 f9 iso800

Again focusing on the little red bug, notice the magnification which is far superior to using the 25mm ext tube, if anything I would say that the quality of this shot is better than with the ext tube, we also have the ability to focus to infinity restored, our MFD is back to 14.6ft, quality is in my opinion better then the extension tube image plus magnification is better too.
So for my final attempt I use both the 1.4x and the 25mm extension tube !
 
Canon 5dmk4 700mm 1\332 f9 iso800

Ok with this configuration we do get a better magnification but the image is a lot softer, I also noticed that I could focus out to maybe 20m.
Summing up my quick test for me the obvious choice is always going to be the 1.4x extender, quality of shot, ability to focus to infinity wins hands down.
That said 25mm extension tube works wonders on my 70-200mm for a bit of close up work.

Friday, 18 August 2017

My Custom Settings And Preferences

Lets start by saying that my custom settings have evolved over the last few years and changed with the various camera bodies that I have had,
Canon 30d, Canon 5dmk2 followed by a mk3 and currently a mk4.
Again I must stress that there are no wrong and right settings its all about what works for the individual.
The mk4 has some really nice custom settings available, nearly all the buttons can be re-programmed to suite an individuals photography needs, I do like to keep it as simple as possible though.
Seeing as I mainly shoot birds and wildlfe I have my settings tweaked to make life as easy as possible for me out in the field, I need to be able to switch from a static bird setting to a Birds In Flight (BIF) setting at the drop of a hat.
In order to achieve a BIF setting at the drop of a hat I have set C3 up as my goto BIF setting a quick press of the button and a spin of the selector and I am at C3, you might ask why not use C1 as you dont have to spin the selector so far, well being an old git I cant remember where any of the settings are but I do know C3 is the last one so I can turn the selector without looking at it and know for sure that I am going to hit my BIF setting everytime, sometimes you dont get a second chance, if you mess up its over in a flash and the opportunity is gone.

 Bearded Tit
Canon 5dmk4 @ 700mm 1\400th f8 iso200

OK my basic BIF settings are set to TV mode 1\1600th, Auto iso with an upper limit of 800, +1ev, AI Servo AF, High speed continuous, I can quickly change the shutter speed and adjust ev if required but the above settings are a good place to start for me.
I also have Case 2 slightly tweaked selected for BIF, I always shoot with white balance set to "daylight" and picture style set to "Faithful", as I always shoot in RAW most of these can be tweaked in post processing.
One thing I was shown when I first got my 30d was to use the "AF-ON" button setup to back button focusing, I have used this ever since, on the 5dmk4 however you can customise this button and the "AE Lock" button, and whats more you can set up a whole host of  other settings on these buttons which can transform the ease of moving from spot AF for sitting birds to AF Expand for moving birds.
I have the following custom Settings:
Shutter Button set to "Metering Start" Only

AF On Button Set to "Metering and AF Start"
In The AF On Sub Menu I have set the following:
AI Servo Characteristic = Case 1 Versatile Multi Purpose
AF Operation = AI Servo
AF Area Selection Mode = Spot AF

AE Lock Button Set to "Metering and AF Start"
In The AE Lock Sub Menu I have set the following:
AI Servo Characteristic = Case 2 (Tweaked) Continue to Track Subjects Ignoring Possible Obstacles
AF Operation = AI Servo
AF Area Selection Mode = Expanded AF

 Cock Linnet 
Canon 5dmk4 @ 700mm 1\400th f8 iso200

So for a bird perched I use the AF On button to aquire focus using spotAF to get accurate focus on the area of the bird that I want, and then shutter button to take the shot, if I release the AF On button I retain focus on the bird this acts as one shot AF.
If the bird decides its had enough and flys off I switch to AE lock button, I then have a larger area to obtain focus, it also switches to case 2 in the AF characteristics to help me keep focus locked onto the bird.
I think Canon missed a trick here they should have given the option to also set the shooting mode and relevant shutter speed and or aperture.
I hope that all makes some sense, please feel free to comment and open up discussions and add your own suggestions.
 

Sunday, 13 August 2017

My Camera Settings

Just for the record I shoot with Canon bodies and lenses, over the few years that I have been back into photography I have built a decent kit up, made lots of stupid purchases along the way mainly because I am stupid and tried to do stuff on the cheap, partly because I couldn't find the information I wanted and thought I would give it a go, as you do, only to regret spending money on something that either didn't do what it said it would or just did it badly, sometimes you cannot compromise on quality and price.

Currently I am shooting with a Canon 5dmk4 which I have only had for about 2 months, I was looking to replace my 5dmk3 and was a bit torn between getting a 5dsr, a 5dmk4 or a second hand 1dx.
After doing hours of research and reading lots of reviews and taking my photography requirements into account I plumped for the 5dmk4 as it is a little more versatile than the 5dsr has a faster frame rate and has newer technology than the 1dx, plus its brand new.
Am I pleased with it to date ? yes I am, when it churns out images like the Sedge Warbler below then whats not to like.

Sedge Warbler
5dmk4 @ 700mm 1\1250th f7.1 iso640
Anyway I digress from the theme of camera settings. I will do a separate post with regard to AF or purple tab.
I stress these are my settings that work for me, there are no right and wrong settings as far as I am concerned, if it works for you then it right for you.

Red 1
  1.  Image Quality = RAW
  2. Dual Pixel Raw = Disable
  3. Image Review = 4 sec
  4. Beep = Disable
  5. Release Shutter Without Card = Off
  6. Lens Aberration Control all settings under this are disabled
Red 2
  1. ISO Settings
  2. ISO speed = Auto
  3. Range for Stills = 100-3200
  4. Auto Range = 100-800
  5. Min Shutter Speed = Auto
  6. Auto Lighting Optimiser = Off
  7. White Balance = Daylight
  8. Colour Space = sRGB
Red 3
  1. Picture style = Faithful
  2. Long exp noise reduction = off
  3. High ISO speed NR = Standard
  4. Highlight tone priority = Off
All other settings under Red 3 are disabled
All settings under Red 4 are disabled or Off
All settings under Red 5 and Red 6 are untouched

I will deal with Purple AF tab later.

Everything under Blue tab 1 and 2 remain untouched.
Blue 3
  1. Highlight alert = Enable
  2. AF Point Display = Enable
  3. Playback Grid = Off
  4. Histogram Disp = Brightness
  5. Movie Play Count Rec Time
  6. Magnification (apx) = 8x
  7. Ctrl over hdmi = Disable
Yellow 1
  1. File Numbering = Continuous
  2. Auto Rotate = On
Yellow 2
  1. Auto Power Off = 4min
  2. LCD Brightness = + 2 stops
  3. LCD colour tone = Standard
  4. Viewfinder Display = All Off
  5. Touch Control = Standard
Yellow 3 all options remain untouched

Yellow 4
  1. HDMI frame rate = Auto
  2. GPS Settings = All disabled
  3. Communication settings = All Disabled
Yellow 5
Custom Shooting Mode I have set up a Bird In Flight profile which is registered to C3
Copyright Information is filled in with my details.

Orange 1
Both Exposure level and ISO speed setting are set to 1/3 increments
  1. Bracketing Auto Cancel is ON
  2. Bracketing Sequence is -0+
  3. Number of bracketed shots  = 3
  4. Safety Shift = Off
  5. Same Expo = Off
Orange 2 Nothing changed on this tab
Orange 3 Only Custom Controls  have been changed on this tab (I will deal with these later)
Orange 4 and 5 nothing changed on these tabs

Green Tab I haven't changed anything here.

That's pretty much how I have the camera setup, I will deal with Custom Settings and AF in a separate post.

Saturday, 12 August 2017

Oare Marshes

Arrived at Oare 0600 quite a lot of cloud about initially but it soon cleared to reveal a beautiful sunny morning with light winds, perfect conditions for Bearded tits to be climbing up the reeds to feed which is what I am after today.

Juvenile Reed Warbler
Canon 5dmk4 700mm f7.1 1\800th iso 800

I set off from the car park along the sea wall heading toward the seawall hide, pretty quite but at least no dog walkers or joggers (yet) spotted the above almost straight away, a few yards further on round the corner from the seawall hide I came across a bush full of juvenile Linnets sitting preening in the sun.
The berries on the bush made a nice addition to the picture

Juvenile Linnets preening in the early sun
Canon 5dmk4 700mm f9 1\800th iso 800
Juvenile Linnet preening in the early sun
Canon 5dmk4 700mm f9 1\800th iso 800
Juvenile Linnet preening in the early sun
Canon 5dmk4 700mm f7.1 1\800th iso 800
Juvenile Linnet soaking up the early sun
Canon 5dmk4 700mm f7.1 1\1250th iso 800
I carried on walking up towards the sluice several flocks of Black Tailed Godwits flew off over the estuary.
 One of many flocks of Black tailed Godwits flying off of Oare out over the estuary.
Canon 5dmk4 700mm f6.3 1\1600th iso 500 +1ev

Then I saw a Grey Wagtail again a juvenile, there was a pair of them but I only managed to get a shot of one of them before they flew off.
 Juvenile Grey Wagtail
Canon 5dmk4 700mm f7.1 1\1250th iso 800
A bit further along I spotted a Whimbrel lurking in the grass out on the creek.
Whimbrel
Canon 5dmk4 700mm f7.1 1\1025th iso 800
I went up over the sluice nothing of interest as of yet I had not heard or seen any Bearded Tits !!
The joggers and dog walkers were arriving by the bucket load which means it is time for me to reverse route and head back to the car park, on the way I noticed a big fresh pile of dog shit politely left behind by one of the recent dogs, FFS if you got a dog clear up after it !!
If it was down to me they wouldn't be allowed to walk dogs round there at all, quite a few are still off the leads as well which annoys me its a Nature Reserve if you must walk them there keep em on a lead !!
I did see two Beardies but too far away for pictures.
Nothing else of any interest, packed up and went home for some breakfast and a cuppa !

Friday, 11 August 2017

My flikr site link

My pictures can be found on flikr at the following location:


Just click on the link and it should open up in a new window, please feel free to like and leave comments.
And if you want to buy any of my pictures or use them in publications etc please add a comment on the blog and I will be notified via email.

Fri 11.8.17 Oare Marshes

Weather and wind are looking favourable, so off to Oare it is as long as I hear my alarm, batteries are charged, bags are packed lets see what the morning brings !!

Thursday, 10 August 2017

Auto Focus Micro Adjustment (AFMA)

Auto Focus Micro Adjustment is a mechanism Canon have built into the firmware on a number of their models, it is to allow a user to correct small errors on front or back focusing.
Canon have also made available a free  Micro Adjustment guidebook available here: http://www.canonwatch.com/canon-publishes-free-canon-eos-af-microadjustment-guidebook/
Front and Back focusing creep in during the manufacturing process, everything is built to a certain tolerance + or - xxx for example.
What this can equate too is if I have a lens that is +10 and a body that is +10 when you put the two together your focal point is going to be out by +20 which will mean that no matter where you focus on a subject the actual focal point will be out by a factor of +20.
This can and does make a lot of difference as I found out from experience, time for a little story.

I had arranged to meet up with a friend who was bringing with him a Canon 1dmk4 for me to use for the day, skipping to the end of the day when I got home and checked what I had nothing was sharp had the odd shot that was acceptable but not one was tac sharp, we couldn't understand what went wrong for starters, we met up again and this time my friend bought his AFMA alignment guide with him and we MA'd my lens to his 1dmk4 and realised that the issue was my lens was back focusing by a factor of 10, this was enough to throw the focus out resulting in a virtually wasted day.

From that day on I built my own very crude but effective AFMA guide and have religiously MA'd all my lens combinations to my body, its a simple process that cannot harm you camera or lens in any way and can simply be disabled in the AF menu.

I think it is crucial to carry out this procedure if you want to obtain the best performance from your camera and lens combinations, after all we pay a lot of money for these items it seems false economy not to perform a free calibration procedure to fine tune the focal accuracy, as when using a long lens with subjects that are relatively close the DOF can be pretty shallow and if your camera and lens combination is either front or back focusing the resulting image will not be truly sharp as you intended it to be.

A simple test using a scale printed on a sheet of A4 can be used, here is an example.

This was a test shot taken using my Canon 100mm f2.8 L IS, the above shot is uncalibrated I am using the centre line as my physical focal point, notice that the centre line is reasonably sharp as is the red text, but it is plainly obvious from the scale that this lens is front focusing its actual focal point is around the 8-10 lines, looking behind the centre line we can see that the scale is not sharp and beyond 14 is not really legible, yet 14 in front of the centre line is clearly legible.

This shot was taken after using the AFMA menu and applying a setting of +10 as we can see the centre line and text are lovely and sharp and the scale is sharp pretty much equally in front of and behind the centre line, we have successfully moved the actual focal point to the physical focal point if anything it might just need knocking back to +9.

It does show just how much difference AFMA can make to your focal point

My MK2 AFMA adjustment guide is copied from a friend of mine Dave, it cannot get much simpler, three bean cans screwed to a piece of wood, I have added a scale in the form of a bit of an old tape measure to give an added guide.

 So all I did was enjoy the beans on toast, then mark a centre line on my bit of wood and from that centre line I measured 100mm in front and behind and marked out two more lines, drilled the centre of all 3 empty cans and screwed them to the bit of wood turning them so that they are all presenting the same text etc for comparing the focus, finally I added the tape measure.

To use it is simple Canon recommend 50 x the focal length of the lens as a minimum distance to the target for AFMA, which equates to 25m for a 500mm lens, however with lenses of 300mm upwards this can be reduced to 20x the focal length which is a much more manageable 10m.
  1. With your camera on a good solid tripod measure out your distance (in this case I will stick with 10m) to target as per your focal length.
  2. Place your target at the same height as your camera and place it at approx 45 degree angle across the focal plane.
  3. Ensure you have good lighting when doing the test.
  4. Set AV Mode
  5. Using your widest aperture (in my case f4)
  6. Set ISO to 100
  7. Set AF Mode to One Shot
  8. Set Drive Mode to Single Shot
  9. Set AF area to Spot and use centre spot only for focus point accuracy
  10. To minimise camera shake you can also use shutter delay or mirror lockup or remote release
OK with that done you are ready to go , now using AF, focus on the centre can and fire off the first shot, this can be reviewed on the rear screen, zoom in and see what is sharp.

  Shot 1 no AFMA adjustment when zooming in on this picture if we look at the 410g on each can, front can soft, centre can sharper, back can sharpest of the three, baring in mind our focal point is the centre can this tells us that this camera and lens combination is focusing towards the rear can or back focusing.

To adjust this is simple we hit the "MENU" button scroll to the purple AF tab on my 5dmk4 it is page 5 (it may be on a different page depending on camera model) last option "AF Micro adjustment", firstly you need to Enable AFMA, then choose "Adjust By Lens", then press "INFO" in the case of my prime lens I am presented with a scale of + or - 20 (if you are using a zoom lens there will be two scales one for "Wide" and one for "Telephoto") as my lens is back focusing I need to dial in a - setting to bring the focal point forward towards the centre can.
I am going to dial in -5 for starters and see how that goes press "SET" to access the adjustment use the wheel to dial in your setting and press "SET" to save it and press "MENU" 2 times to come back out.
The resulting shot with  -5 AFMA dialled in, to me this appears to be a big improvement on the initial shot after a few more shots I settled on -6.
One thing to do between each shot is de-focus the camera, de-focus towards infinity and then macro, this is so that the AF mechanism has to work from both sides of the focal point which will show up any slop in the AF mechanism.
Finally when you are happy with the setting from the adjustment menu press "Q" to enter the lens serial number (if it has not been automatically detected) to register your lens setting in memory.
Now whenever you put this lens combination on your camera it will apply the relevant AFMA setting.